Saturday, January 28, 2012

Project Baby Shower: The Bunting

I have been busy making all kinds of cute stuff for next weeks Baby Shower! My latest project was the bunting that will go on the fireplace. The color inspiration for this shower came from a beautiful quilt that my mother-in-law made for my daughter. Looks a little something like this:
I LOVE LOVE LOVE these colors. Perfect for the vintage shabby look I'm going for. And, I happen to have a bunch of leftover fabric from this quilt. This quilt is going to serve as the table cloth on the food table, so having extra fabric means it will all match so perfectly! So here's what it looks like:
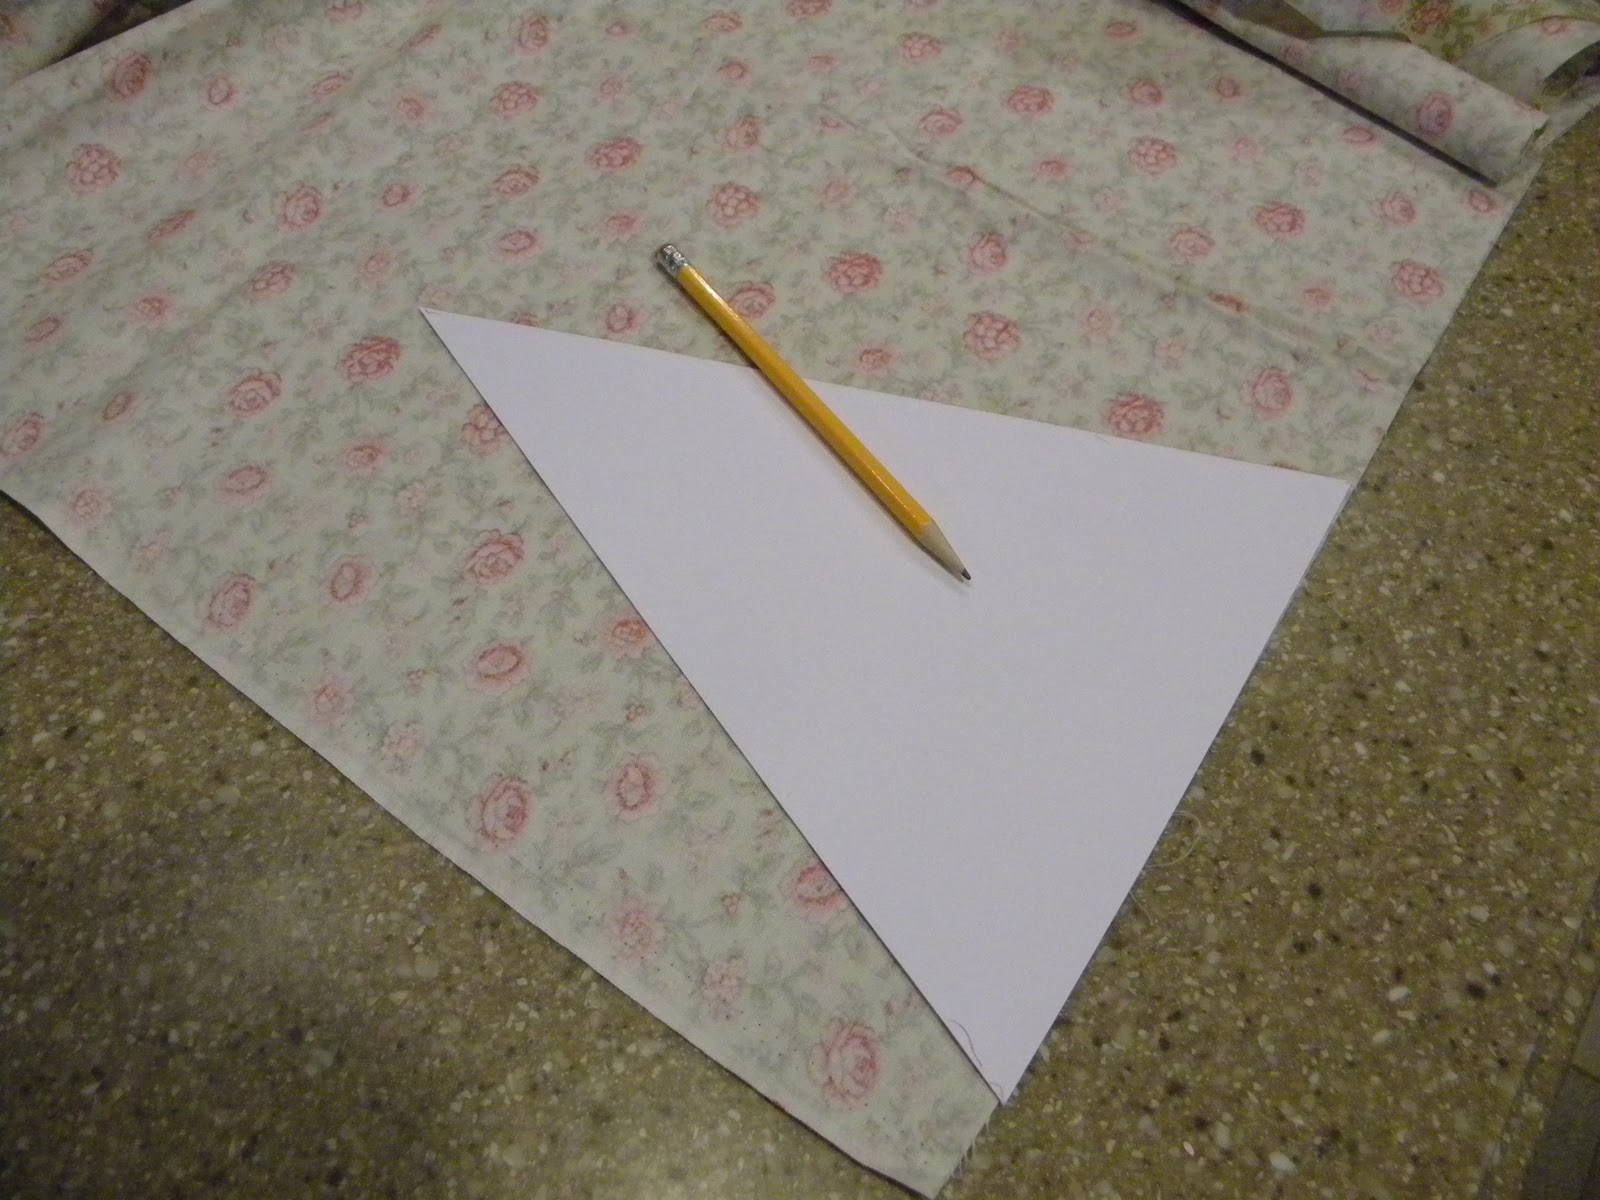
And here's what I did:I cut a big triangle out of cardstock and traced it onto the back of 7 different fabrics.

Then I cut them out, leaving about 1/4 of an inch around the triangle:
I cut out triangles out of 7 different fabrics, and then I just took the fabric that I had the most of, and cut out 7 more triangles for the back:

Then I lined up one front and one back piece, right sides facing each other, and sewed down the two long sides of each triangle:

Then I trimmed around the point of each triangle so there wouldn't be so much bunched fabric when I turned them inside-out:

I keep a skewer next to my sewing machine to help push the fabric down and get a nice point on my triangles. Then I just ironed each one down, and trimmed that little piece of extra fabric on the tops of the triangles.

At this point I decided that I wanted to add a little bit more detail to my bunting, so I cut a smaller triangle out of cardstock, trace 6 more fronts, and 6 more backs. I sewed them the same as I did the bigger triangles, and ironed them flat.
When I had all 7 big triangles and all 6 little triangles sewed and ironed, I lined them up on my floor to get them in the order I wanted them:

I pinned them in place, and then using some cheap little cream colored eyelet lace I found at Joanne's, I sewed it right along the top of the bunting. I left about 6 inches of lace on each end to hang up the bunting with.

And here is the finished banner!

I love how it turned out. I think after the party I'll have to find a permanent home for this bunting in my daughter's room, because it matches her quilt right?!

Monday, January 23, 2012

Project Baby Shower: The Cake Stands

I'm so excited that I get to throw a baby shower for my dear friend next week! I LOVE that I get to celebrate her beautiful sweet (and super chubby!) baby with all of our friends!
I'm also thrilled to get to be the one to plan the party, and therefore, paint many things pink. :) 
The theme started with these two beautiful old windows that I have, one is white and the other is pink. I love the vintage and shabby look, so after going through my house and finding all sorts of things that fit, the theme really started to come together. I spent many a night on Pinterest finding all sorts of inspiration:
 I found the perfect colors on this window from Design Dazzle. Love the old window!
I have a set of white birdcages like these I found at Great Rooms Decor.
I will do my best to replicate these beautiful favor boxes from Accent The Party. This party from frogprincepaperie.com also has a lot of inspirational ideas:

One of the first things I knew that I would need is a set of pink cake stands. They are so easy to make, and I know I'll use them over and over again. I made these red ones a while back for my daughter's birthday party and I have been able to use them for several parties since. Red is a very useful color. After I made these and realized how easy and cheap they were, I couldn't wait to have an excuse to make a set in every color! That could be a new goal for me. 

 I got these unfinished wood squares at Hobby Lobby and the table legs at Home Depot:
Then I painted them with several coats of the prettiest pink paint you ever did see:
The since I'm going for an older shabby look, I sanded the dickens out of them:

Then I took the two bottom pieces, and found the center:

I used a drill bit about the size of the screw on the bottom of the table legs to drill a hole half way through the piece of wood. JUST HALF WAY THROUGH!


Then the table legs will screw nicely onto the bottom of the cake stands, like so:

Then I took them outside and sprayed each piece with some clear matte finishing spray. This will give them a more finished look and also make those areas that you sanded stand out a little more.
Next I took the two top pieces, turned them upside-down and found the center. Then I just hot glued the end of the table legs, and glued them in the middle of the top piece. Make sure if your cake stands are square that you line the top and bottom up to match.


And Tah-Dah! Two beautiful pink cake stands!
Stay tuned for the next Baby Shower project!

Saturday, January 21, 2012

Puppy Love Valentines Day


Last year for Valentine's Day I wanted to do something special for my kids. I found this adorable idea from The Gala Gals where we got to celebrate all day long. What I loved about this idea was that it was REALLY cheap. I hardly had to buy anything and yet it turned out SO cute! My kids talked about it for weeks!

It started with the theme "Puppy Love". The night before Valentine's Day, after the kids were in bed, I decorated the kitchen table with a cheap red tablecloth, some heart confetti, and a picture I made that said "puppy Love'. I found these adorable dog food containers at the dollar store and knew they'd be perfect for the day's theme! My kids thought it was HILARIOUS that I made them eat out of dog bowls! I also printed out a simple picture with the theme and their names, then I laminated them so we could use them as place mats.


While at the dollar store, I found these Valentine stuffed dogs. I had to have them. I'll buy anything for a buck.

So when the kids got up in the morning they found this:
Then to start the day off, we had cocoa puffs in our dog bowls. Awesome, right? Cause it looks like dog food.


I also happen to have a bone shaped cookie cutter that I had never had a reason to use until now. So we had bone shaped toast with our cereal.

Then, while the kids were at school, I got started on some more Puppy themed fun. I made bags with their names on them and filled them with Puppy Chow.


Then, since I knew my kids would think it was super hilarious, I printed out a picture of a fire hydrant and taped it to a plate. I cut up some green paper to look like grass and then I made some chocolate cake balls. It turned out super cute!
When it came time for dinner, we made personal sized pizzas:

I have a mini heart cookie cutter that we used to cut the Canadian bacon into little hearts, because hey, it's Valentine's Day.
We also made bone shaped garlic breadsticks:


We also had pink lemonade in sugar rimmed glasses:


It turned out to be such a fun and inexpensive way to celebrate Valentine's Day and my kids LOVED it! They keep asking me what I'm going to do this year--I'll give you a hint...it looks a little something like this:
Eeeeek! I'm so excited!
Linking up here: